Resource Centre - Blood Bank Module
The Blood Bank module displays Blood Bank products and tests contributed from source systems. The Blood Bank module also displays the available Group and Screen information for the patient in the banner below each Blood Bank header.
To access the Blood Bank module, click the Blood Bank option in the Clinical Modules menu.
The Blood Bank module includes three tabs: 
- Products – Lists blood bank products including product details when selected
- Tests – Trends Blood Bank test results
- Trend – Displays multiple test results in a timeline
If new Blood Bank results or products are available for the selected visit, the module will be flagged with the orange New Result indicator and a number showing how many new results are available. See the New Results section to learn more about how new results are flagged.

 OLIS data is currently not available in the Blood Bank Module and will not display any product or test information in these views.
The following table provides a summary of a feature of the Blood Bank module.
| Feature | Summary |
|
Group and Screen Information Banner |
Provides a quick view of Blood Type, Markers, Antibodies, and Antigen test results based on the selected patient’s Medical Record Number (MRN). NOTE: The Blood Bank banner information may not be available from some source facilities. |
Products Tab
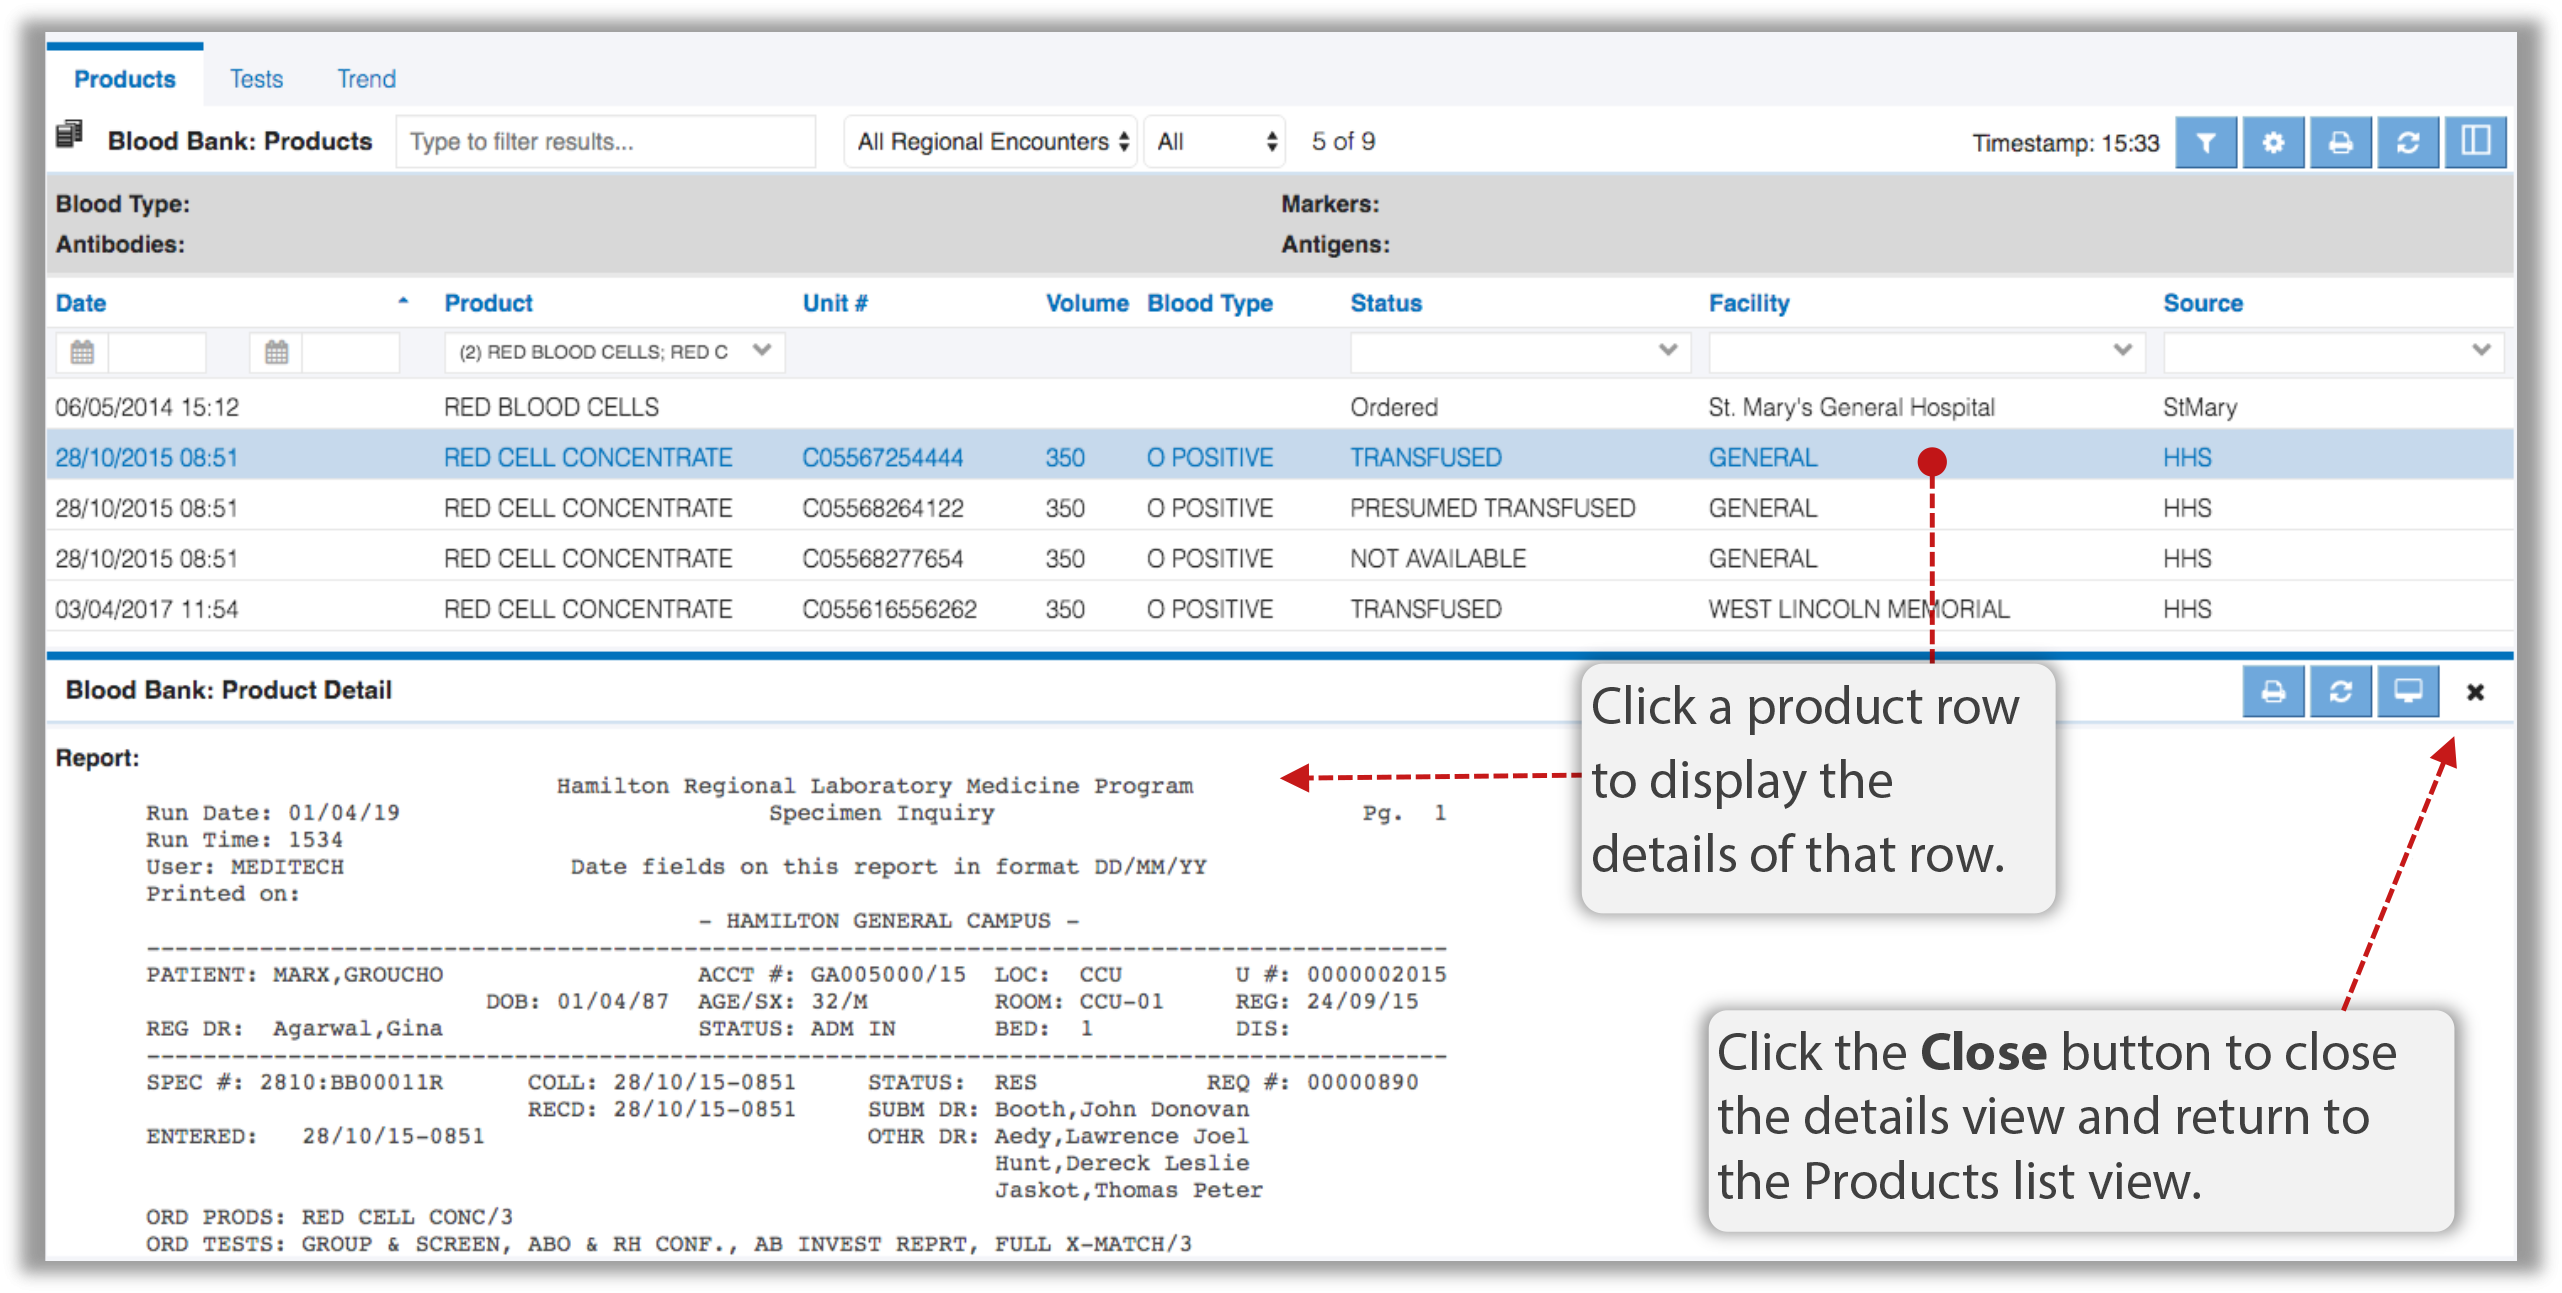
The Blood Bank: Products module displays blood bank products from source hospital systems.
To access the Blood Bank: Products module, click the Products tab.

 Blood Bank product information from select contributing facilities, may include a single unit volume in the Volume column, followed by a quantity in parenthesis as shown in the example above.
In such cases, the total product volume would be defined by the quantity indicator.
For Example: 100 mL (Qty:2.0) would indicate a total volume of 200 mL.
In addition, some blood product data line items will not display any product details if selected from the list view from select facilities.
Viewing Blood Bank: Products Details
To view the details of a listed blood product, click the row of the product to view additional details if available.
 Some blood product data line items will not display any product details if selected from the list view from select facilities.

Depending on your preference settings, Product Detail will either show up to the right of the results list or below the results list.
Blood Bank: Products Preferences
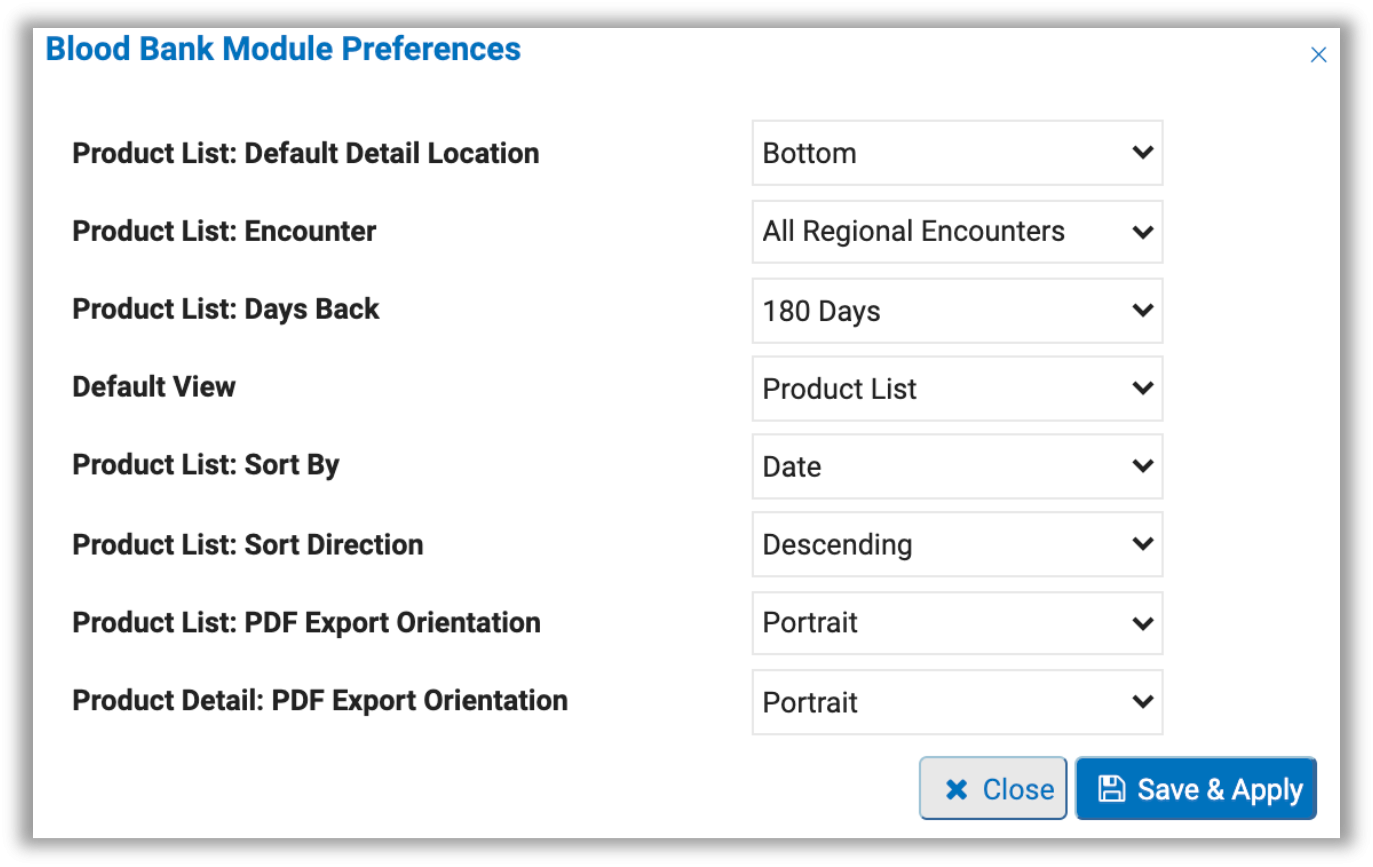
The Products view has it’s own set of preferences that can be accessed and configured by clicking the Preferences button  in the module header or by using the Preference Setup Wizard.

After updating your preference settings, click the Save & Apply button to save your changes.
To learn more about the various preference setting options, please visit the Common Preference Settings in ClinicalConnect section.
Blood Bank Tests Tab
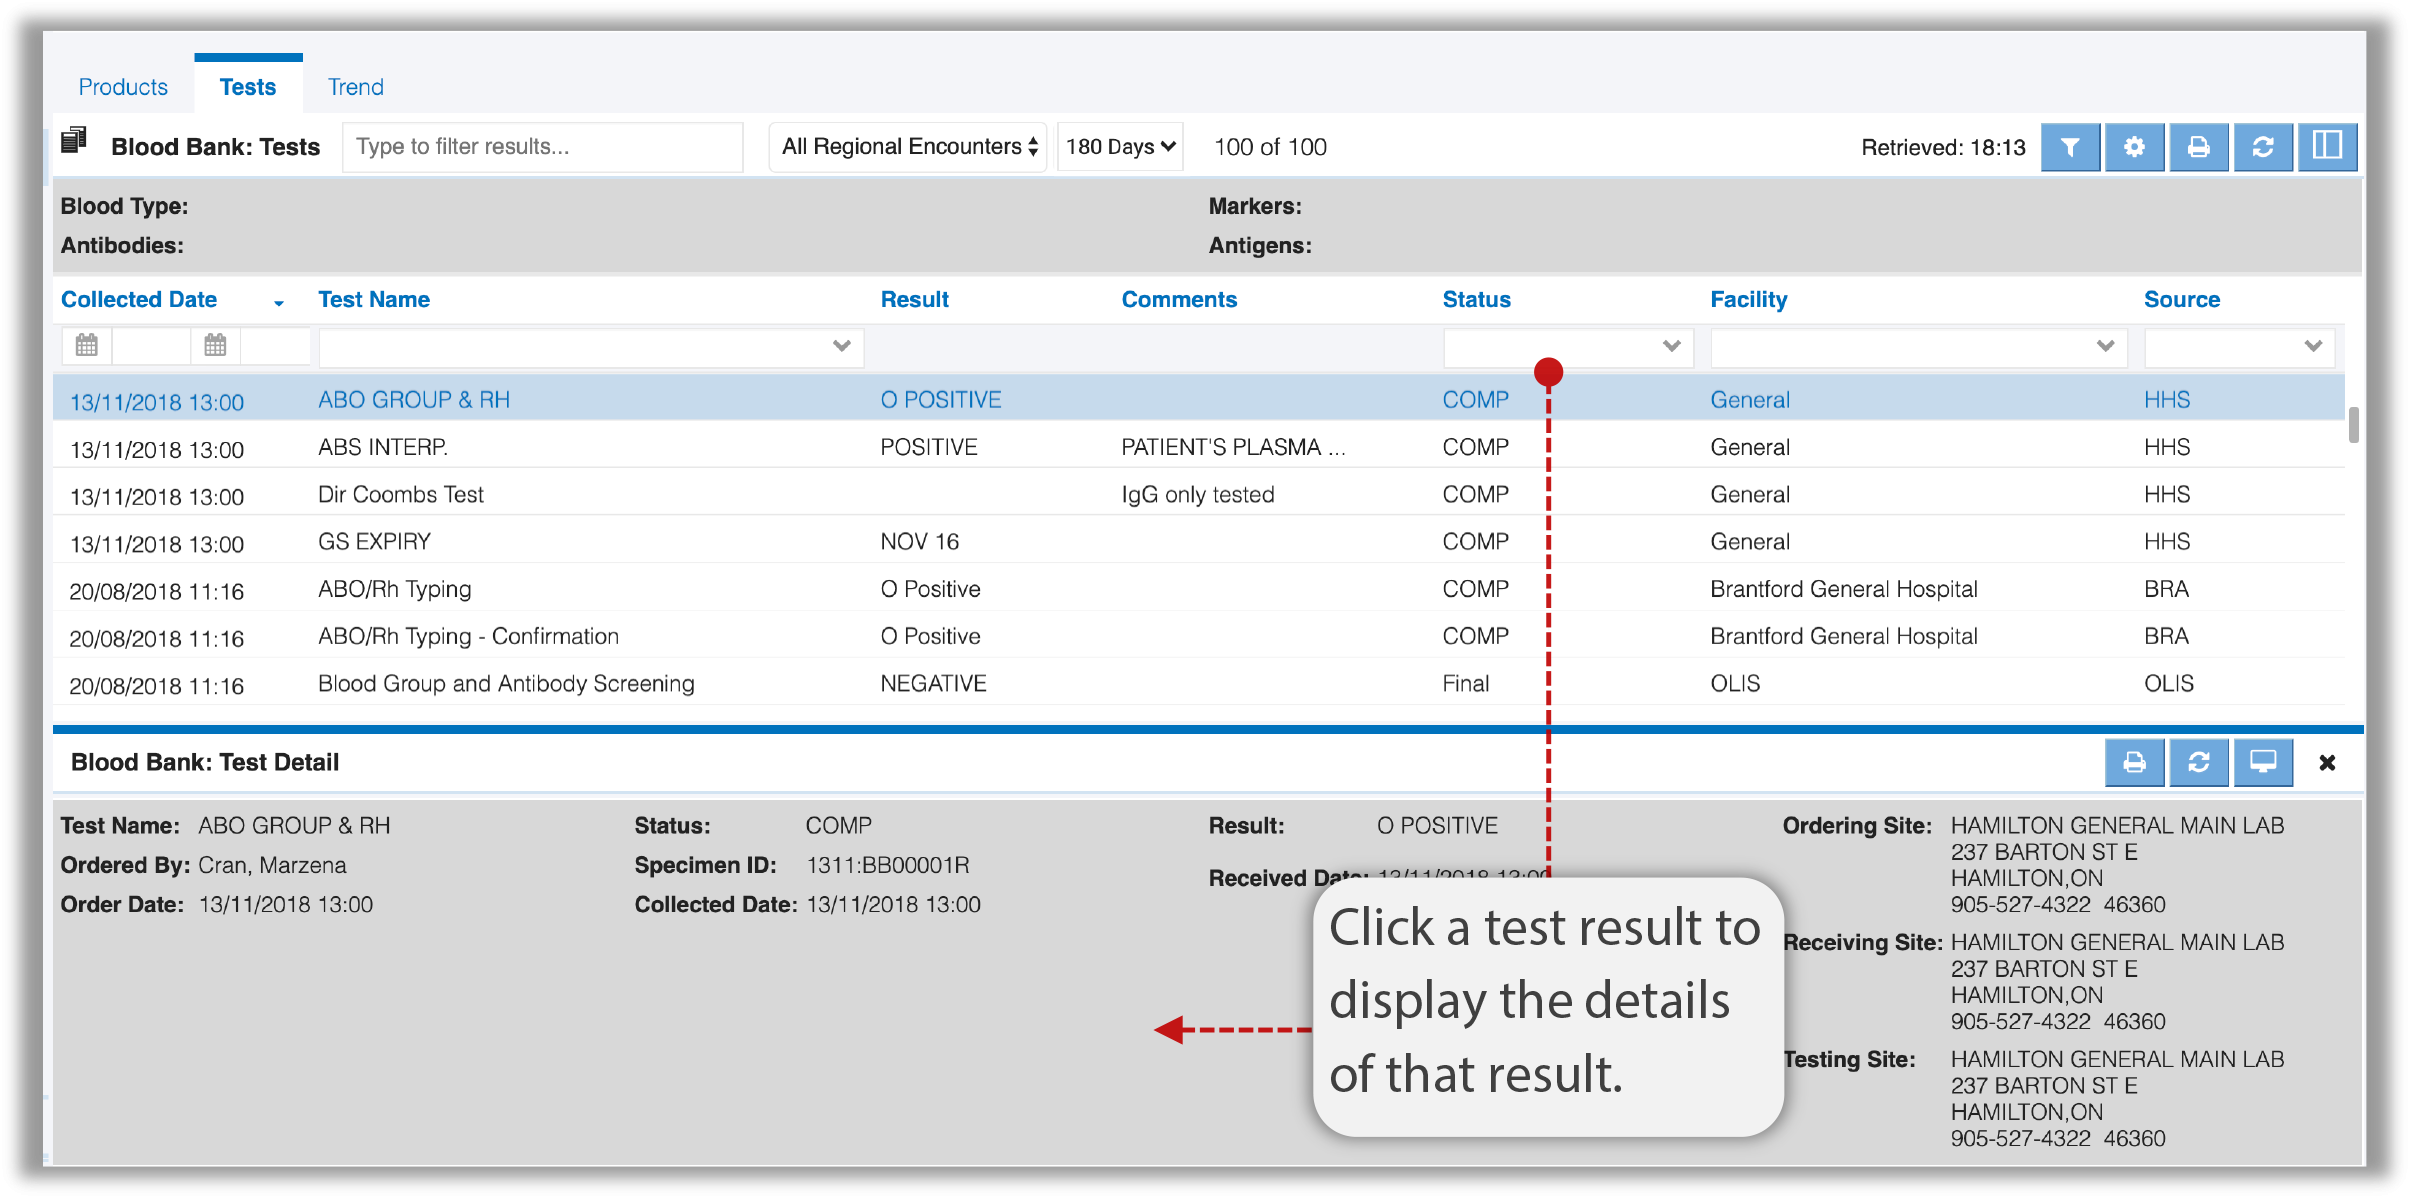
To access the Blood Bank Tests view, click the Tests tab located above the Blood Bank header.

 Some blood test data line items from some facilities will not display any additional blood test details if selected from the list view.
The following table provides a summary of a key features of the Tests view.
| Feature | Summary |
|
Smart Filter |
Text typed in the Smart Filter Search box narrows the list of results to display only those related to text you entered. In the example above, the user wanted to narrow the list of results to display only antibody tests with a positive result. This was done by entering anti pos in the Smart Filter search box, which means you only want see information that include both anti AND neg.
All other results were filtered out and do not display in the Results List view until the contents of the Smart Filter are cleared.
|
![]() Antibody Identification test results from Hamilton Health Sciences with the source of HHSC and where multiple antibodies are identified for the same collection date, will present in a rolled-up list and will display the Expand icon to the left of the line item.
Antibody Identification test results from Hamilton Health Sciences with the source of HHSC and where multiple antibodies are identified for the same collection date, will present in a rolled-up list and will display the Expand icon to the left of the line item.
To view the associating antibody results click the Expand icon.

Viewing Blood Bank: Test Detail
To view blood bank test details, click the row of the result you want to display the details view.
 Some blood test data line items will not display any product details if selected from the list view from select facilities.

Click the Close button  to close the details view and return to the Test Results List.
Blood Bank: Test Preferences
The Test view has its own set of preferences that can be accessed and configured by clicking the Preferences button  in the module header or by using the Preference Setup Wizard.

After updating your preference settings, click the Save & Apply button to save your changes.
To learn more about the various preference setting options, please visit the Common Preference Settings in ClinicalConnect section.
Trend Tab
To access the Blood Bank Trend view, click the Trend tab located above the Blood Bank header.

The following table provides a summary of some of the key features of the Trend view.
| Feature | Summary |
|
Trend Order
|
Lists test result trends from oldest to newest or newest to oldest. |
| Result Trend View |
All test results are displayed in date stamped column. Scrolling left and right allows you to see the progression of test results based on the date the test occurred. |
Blood Bank: Trend Preferences
The Trend view has its own set of preferences that can be accessed and configured by clicking the Preferences button  in the module header or by using the Preference Setup Wizard.

After updating your preference settings, click the Save & Apply button to save your changes.
The following table provides a summary of a specific preference setting for this module:
| Preference | Description |
|
Trend Direction |
Sorts the date columns by Newest to Oldest or Oldest to Newest |
To learn more about the various preference setting options, please visit the Common Preference Settings in ClinicalConnect section.
 Return to Resource Centre
