Resource Centre - Smart Filter
 Return to Resource Centre
Video Tutorial
The Smart Filter is a text based filtering tool that allows you to filter results by any keyword, partial word, number, or date displayed in the view. A Smart Filter search hides rows from the results screen that do not match the leading characters entered in the Smart Filter box. This is useful if you need to narrow down your results to view specific data. The Smart Filter searches the entire grid to find any data that has the leading characters entered into the search then , displays data that starts with those leading characters. The Smart filter also allows for the use of AND/OR conditions allowing for the combination of terms to be searched. This is described in more detail below.
Example: To narrow down the search results to display only items from the HHS can be done by typing HHS in the Smart Search box. Only rows that have the leading characters ‘HHS’ are displayed. Any row not containing HHS is filtered.
 The Smart Filter feature is available in multiple modules and census lists. Clearing the data from the Smart Filter box will display all previously filtered.

Conditional Smart Filter
Conditional filter terms are a great tool you can use when using the smart filter. These are also known as AND/OR conditions.
AND Condition
The AND condition is used if you want to only show rows of results that include two or more specific keywords. To use this condition, simply use a space to separate each keyword you want to include in your results.
Example: If you are looking for discharge summaries from any site at Hamilton Health Sciences (HHS), you could type dis (space) HHS in the Smart Filter Search box.
Transcriptions that only include text with both dis and hhs are displayed.

OR Condition
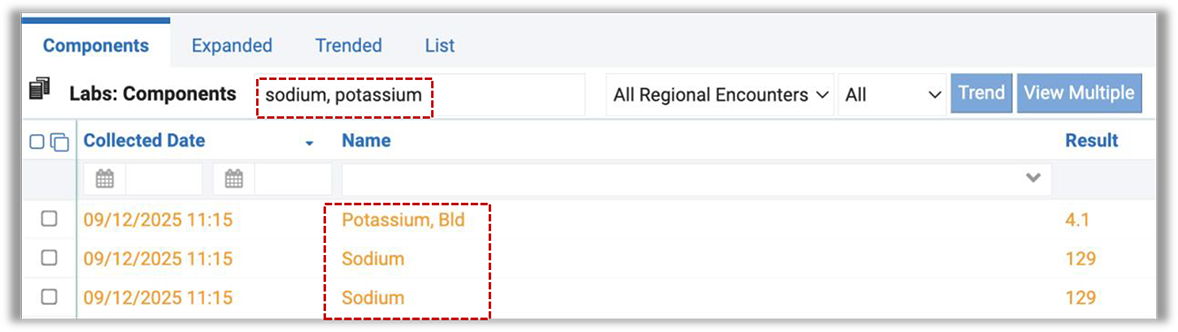
The OR condition is used to display rows that include one or more keywords by simply using a comma to separate each keyword (or partial word) you want included in the filter.
Example: You want to view your patient’s results for all sodium or potassium labs. To locate these labs you would type sodium, potassium in the Smart Filter Search box.
Only lab results that include potassium or sodium keywords are displayed.
Combining AND and OR conditions
You can combine AND and OR conditions in a single Smart Filter search.
For example; if you wanted to view just consultation and discharge transcriptions from the General facility, type dis, con gen in the Smart Filter box.

Transcriptions are filtered to only those that match the text entered in the Smart filter.
Combining the Smart Filter with Other Filters and Sorting Functions
The Smart Filter can be used on its own or in combination with other filter and sorting functions. Depending on the patient information that you are trying to filter and the module, you may find that the other sorting and filter functions may narrow down the results you are looking for without having to use the Smart Filter. It is up to you to determine which options will best meet your clinical needs.
The following are some suggested practices when using the Smart Filter with other sorting/filtering functions.
1. Set the Encounters filter to All Regional Encounters. This is typically the default setting for all applicable modules. This filter ensures that all available data from all hospital encounters and from provincial repositories (assuming your organization has been enabled to view such data) available in the portal is displayed in the module if available.

2. To narrow down the number of results displayed in the view, you can consider changing the Days Back filter to view a shorter duration.
Example: If you are looking for a Transcription from the past week or two you could set the filter to 30 days to narrow down the amount of records displayed in the view.
3. Sort by columns
Each column in your list view can be sorted in ascending or descending order. This example is showing the Transcription module columns.

Sort by Date
Results that contain a date field (such as Date or Event Date) can be sorted from newest to oldest (and oldest to newest) by simply click the column header containing date information. This sort preference can also be set in the module preferences, eliminating the need to click on the column header each time.
Sort by Name
Columns of data that contain the name of the result or record (such as Test or Name) can be sorted to group common results. Simply click the column header containing the information you want grouped. This makes it easy to go through your list view to find a specific result based on the name of the result.
Printing Filtered Results
You can print the filtered list view results by clicking the Print button  after entering Smart Filter keywords.
See Printing for more information on how to print list and detail views.